
Landscape Lighting Ideas That Don't Look Cheap
Great landscape lighting isn't about blasting your house with light; it's about creating mood, drama, and safety. We'll show you the pro techniques that make a real difference, without the 'pro' price tag.
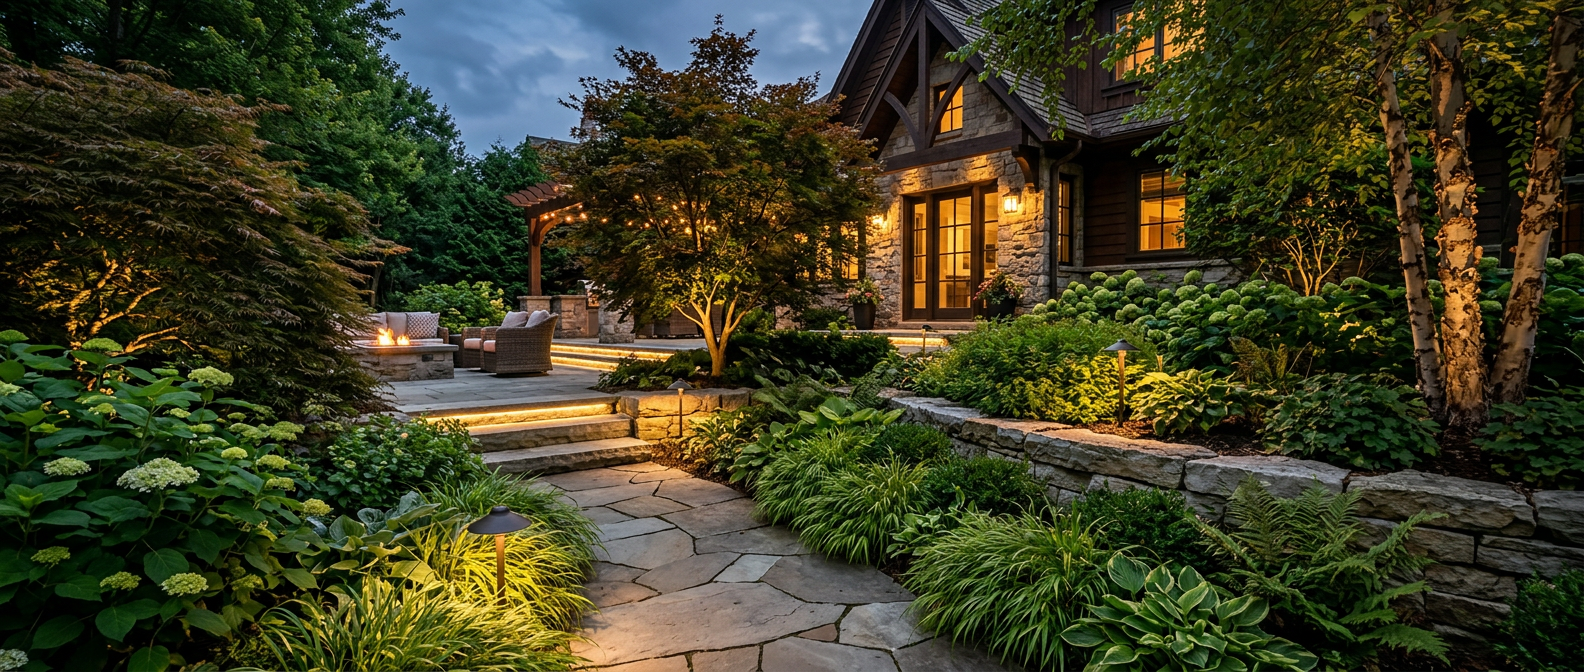
You Don't Need a Pro to Get Pro-Level Landscape Lighting
Let's be honest: most 'DIY' landscape lighting looks awful. A string of weak, bluish solar stakes marching down a walkway like sad little airport runway lights. It's the kind of thing that screams "I went to the hardware store for ten minutes and called it a day."
We're here to tell you it doesn't have to be that way. Creating beautiful, dramatic, and effective outdoor lighting is one of the most impactful upgrades you can make to your home's curb appeal and usability. It adds security, extends your living space into the evening, and makes your property look like a million bucks. And the secret isn't spending a fortune—it's understanding the techniques.
Forget just buying fixtures. We're going to talk about painting with light. We'll cover the core concepts the pros use so you can design and install a system that looks truly custom. This is one of the most satisfying DIY projects you can tackle, and we'll show you how to get it right.
Uplighting: The Foundation of Drama
Uplighting is exactly what it sounds like: aiming a light fixture upwards to highlight an object from below. This is your go-to technique for adding drama and showcasing your home's best features. It's what separates a beautifully lit home from a dark, uninviting one.
What to Uplight:
- Architectural Columns: Place a narrow-beam spotlight at the base of each column.
- Trees: This is a classic. Use one or two lights for a smaller ornamental tree (like a Japanese Maple) and up to three or four for a large, mature oak. Aim the lights up into the canopy to create a beautiful silhouette and textured shadows.
- Textured Surfaces: Stone facades, brick walls, and even fences come alive with uplighting. The light grazes the surface, highlighting every nook and cranny.
Our Experience: We've found that using fixtures with a slightly wider beam angle (like 38-60 degrees) works best for wide trees and walls, while a tighter beam (15-24 degrees) is perfect for columns or tall, skinny trees like Italian Cypress. Don't be afraid to experiment with placement. Moving a light just a foot or two can completely change the effect.
For a solid, will-outlast-you option, look at something like the VOLT All-Star Brass Spotlight. At around $60, it's not bargain-bin cheap, but it's built like a tank and the replaceable LED bulb means you're not tossing the whole fixture when the light eventually dies a decade from now.
Path Lighting: Safety That's Actually Stylish
This is where most DIY jobs fail spectacularly. The goal of path lighting is to illuminate the walking surface for safety, not to create a glowing runway to your front door. The key is subtlety.
The Rules of Good Path Lighting:
- Go Low and Stagger: Place lights on alternating sides of the path, not in two parallel rows. This creates a more natural, organic feel.
- Mind the Spacing: A common rule of thumb is to space lights 8-12 feet apart. The goal is to create overlapping pools of light on the ground, eliminating dark spots without being overly bright.
- Point Down: The fixture's shade should direct all light downwards onto the path. If you can see the bright bulb from a distance, it's creating glare, which is the enemy of good lighting design. This is why cheap, omnidirectional solar lights fail.
- Keep it Warm: Stick to that 2700K-3000K color temperature. It's inviting and works well with natural materials.
For a small backyard design, clever path lighting can make the area feel more expansive and intentional. Look for fixtures with a simple, clean design that blends in during the day, like the Kichler 12V Centennial Brass Path Light, which runs about $70-90. The focus should be on the light it casts, not the fixture itself.
Downlighting & Moonlighting: The 'Secret Sauce'
If you want a truly magical, high-end effect, you need to master downlighting, often called 'moonlighting.' This involves mounting a light high up in a mature tree and angling it downwards. The light filters through the leaves and branches, casting soft, dappled shadows on the ground below, perfectly mimicking natural moonlight.
This is, by far, our favorite landscape lighting technique. It feels completely natural and adds an incredible sense of depth and mystery to a backyard. It's perfect for patios, seating areas, and garden beds.
How to Pull it Off:
- Get High: You'll need a tall, sturdy tree. You'll mount the fixture 20-30 feet up the trunk or on a major limb.
- Use a Wide Beam: A wide flood light with a low brightness (lumen) output is key. You want a gentle wash of light, not a harsh spotlight.
- Conceal the Fixture: Use a fixture color that matches the tree bark and secure the low-voltage wire neatly down the back of the trunk. The effect should feel like it's coming from nowhere.
The VOLT Top Dog R20 Downlight is a great specialized fixture for this, designed specifically for mounting in trees. It's an investment at around $100, but one or two of these can transform an entire backyard space.
Accent & Specialty Lighting: The Finishing Touches
Once your foundational lighting is in place, you can add accent lights to highlight specific garden features. This layer adds personality and guides the eye through the landscape.
- Hardscape Lights: These are tiny, discreet LED lights designed to be built directly into retaining walls, deck stairs, and underneath capstones. They provide both safety and a sleek, integrated look. A 10-pack of LEONLITE 12V Hardscape Lights can be had for under $100.
- Underwater Lights: If you have a pond or fountain, a submersible light is a must. It turns a dark water feature into a shimmering focal point. Make sure you buy a fixture specifically rated for underwater use.
- In-Grade Lights: These are installed flush with the ground and are great for lighting the underside of a fence or the base of a pergola post without creating a trip hazard.
- String Lights: Perfect for patios and decks, but choose wisely. Go for commercial-grade, heavy-duty string lights with shatterproof Edison-style bulbs, like those from Feit Electric. They provide a warm, festive glow that's perfect for entertaining. This is one of the best low-maintenance backyard ideas because the LED bulbs last for years.
Putting It All Together: Power and Control
All these fixtures run on a low-voltage (12V) system, which consists of three main parts:
- Transformer: This plugs into a standard outdoor GFCI outlet and 'steps down' the power from 120V to a safe 12V. Get one with more wattage capacity than you think you need to allow for future expansion. A good 150W transformer costs around $150-200.
- Low-Voltage Wire: This is a heavy-gauge, direct-burial cable (usually 12-gauge or 14-gauge) that runs from the transformer to your lights. You can bury it in a shallow trench just a few inches deep.
- Fixtures: The lights themselves, which you'll connect to the main wire.
A 2022 survey by the National Association of Home Builders (NAHB) revealed that 41% of homebuyers consider exterior lighting an 'essential' feature, and another 40% rate it as 'desirable.' This makes it one of the most sought-after outdoor features, directly impacting your home's value and appeal. A well-designed system isn't just an expense; it's an investment with a tangible return. (Source: https://www.nahb.org/blog/2022/03/what-home-buyers-really-want-in-2022-edition)
Consider a transformer with a built-in timer or, even better, a smart controller. Products like the Ring Outdoor Smart Plug or Kichler's Smart Control Timer allow you to set schedules, dim lights, and control everything from your phone. It's the ultimate in convenience and a perfect finishing touch for your new, professionally-lit landscape.
Frequently asked
What is the best color temperature for landscape lighting?+
For most residential applications, the best color temperature is warm white, between 2700K and 3000K. This range produces an inviting, high-end glow that complements plants and architecture. Cooler temperatures (4000K+) can look stark and commercial, like a parking lot or hospital.
Can I install low-voltage landscape lighting myself?+
Yes, absolutely. Low-voltage (12V) systems are designed to be safe and easy for DIY installation. Since the voltage is so low, there's minimal risk of electric shock. The main tasks involve planning the layout, digging a shallow trench for the wire, and making simple connections.
Is solar landscape lighting any good?+
Generally, no. Most affordable solar lights are unreliable, dim, and produce a cool, bluish light. They lack the power and consistency of a low-voltage system. While high-end solar technology is improving, a wired 12V system is still the best choice for performance, reliability, and professional-looking results.
How far apart should landscape path lights be spaced?+
A good rule of thumb is to space path lights 8 to 12 feet apart. The goal is to create overlapping pools of light on the ground, ensuring the walkway is safely lit without dark spots. Staggering them on opposite sides of the path creates a more natural look.
How do I choose the right transformer for my landscape lights?+
Add up the total wattage of all the bulbs in your plan. Choose a transformer with a wattage capacity at least 20-30% higher than your total. This ensures the transformer doesn't overheat and gives you room to add more lights to the system in the future.